

The 5 Best AI Prompts for Creating Premium Apps in Canva
- Dec 24, 2025
- 9 min read
Updated: Dec 26, 2025
Learn the exact AI prompt system to use to create premium, engaging apps in Canva.
You’ve created a PDF or worksheet, your content is good. People download it. Clients use it. But eventually, engagement starts to plateau and it starts to feel like you’ve hit a ceiling. Maybe people don’t come back to it. Maybe it feels a little dated. Or maybe you just know, deep down, that what you’ve created could be so much more if it were interactive.
If you have 20-30 minutes I’ll show you how a Canva app can be the turning point for you. While Static PDFs are easy to create, they don’t guide people. They don’t adapt. And they don’t feel intuitive to use day after day. Apps do and that’s exactly why turning your content into an app changes everything.
In this post, I’m breaking down the exact AI prompt system to use to create premium, engaging apps in Canva.
This is the system behind the apps I’ve created and shared and it’s designed so you can reuse it again and again.
Content problem vs format problem
Most worksheets and forms get downloaded… and then forgotten. They’re useful, but they’re static. They don’t respond to the user. They don’t guide decisions. And they don’t feel natural to use daily especially on a phone.
People are used to apps. They expect things to be clickable, interactive, and easy to return to. When your content lives inside an app instead of a PDF, engagement increases and your work instantly feels more valuable.
Types of Apps You Can Create
Most great Canva apps start from content you already have or ideas you already understand. You don’t need any tech skills to create them.
For example;
PDFs turned into interactive libraries
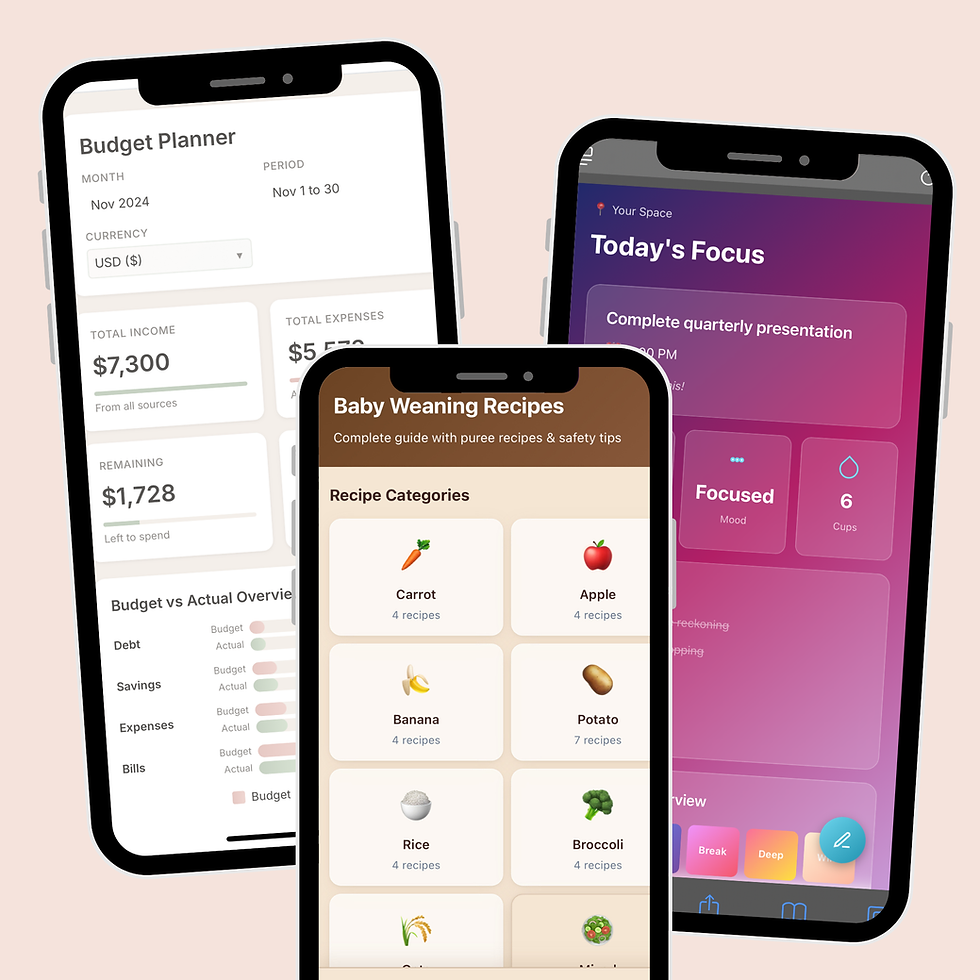
Guides, coaching documents, workbooks, or resources can be reorganised into scrollable apps with sections, buttons, and quick navigation. View Demo of weaning app made from a baby feeding guide.
Excel or Google Sheets turned into dashboards
Spreadsheets can be transformed into visual dashboards with charts, totals, and progress views people actually understand. View Demo of a budgeting dashboard created from an excel template.
Coaching documents turned into guided apps
Programs, exercises, or frameworks delivered step by step can also be made into an interactive experience so that clients know exactly what to do next. View demo of an app used by a wellness coach.
Assessments and sign-on or client management apps
Onboarding tools that collect answers, score responses, and guide users to the right starting point. View demo of client management app used by coaches.
Habit, routine, or challenge apps
Designed for daily use, these are perfect for habits, routines, or short challenges people want to return to consistently. View demo of a premium routine dashboard.
All of these were created using Canva AI. There is no limit to what you can create. From relationship apps that give post breakup comfort to dashboards that help plan finances, or games for quiz night. You just need the right juicy prompts.
The 5 core AI prompts to Create Premium Apps
There are 5 core prompts you will need to turn ideas, PDFs, and worksheets into clean, engaging, premium Canva apps.
1. The Content Breakdown Prompt
This is always the starting point if you already have content.
The goal of this prompt is to take a messy PDF, worksheet, or document and break it into an app-ready structure. Instead of pages, you’re thinking in screens, you’re pulling out actions, inputs, and key information.
“You are an expert at converting digital documents into interactive app components.
I am going to upload a [PDF worksheet]. Analyse it deeply and reorganise it into a clear, app-ready structure with a maximum of 3-4 screens that feel like a real app. For each screen, clearly define the screen name, its purpose in one short sentence, the sections inside the screen, any user inputs, and what the app displays (such as summaries, lists, or progress). Do not design the UI. Do not add new content. Keep text entry minimal and keep the structure simple enough for Canva AI to follow.”
Prompt 2: App Workflow & User Journey
This is where the app design starts. This juicy prompt gives Canva AI the overall goal of your app and how you want the user experience to be. Remember it is an example template that you can tweak to meet your specific app needs.
The formular: [app concept] + [user experience] + [screen specs] + [Home Screen content] + [navigation] + [Data entry instructions]
“You are an expert UI/UX designer, Create a premium, mobile-first [productivity dashboard] with a modern, high-end feel and a clear, intuitive user journey. The app should guide [the user] step by step to [track their daily to-do lists, habits and goals and plan future weeks]. Start with a Home screen that shows [today’s focus, progress, or status at a glance]. From the Home screen, users should easily access [Tracker or Input screen, a Library or Reference screen, and a Review or Summary screen]. Use bottom navigation for switching between screens. Important details or the data input panel should open in compact modals or slide-up panels. Minimise typing and prioritise taps, toggles, checkboxes, and selections. The app should feel easy to return to every day.”
Optional line to add if you’re converting an existing document.
“Use my content [ insert content from step 1 here ]”
03 The Premium Design Prompt
Once you have a basic app created, these are the prompt you need to guide AI to create something that feels modern, clean, and high-value, rather than default or basic. This is where you define:
Overall style (minimal, soft, modern, professional, playful, etc.)
Layout density (compact vs spacious)
Card style, buttons, and navigation feel
How the app should look on mobile first
These prompts are what separates “Canva-made” from “this looks like a real app”.
Prompts you could use:
Option 1 - Specific and detailed:
"Make the cards more compact by reducing padding to 16px. Use a vibrant gradient background (purple to blue). Make buttons pill-shaped with more rounded corners. Reduce the spacing between elements by 30%."
Option 2 - Reference-based:
"Restyle this to look like a modern fitness app - think bright accent colors like electric blue and coral, tighter spacing, bolder typography, and glassmorphism effects on the cards."
Option 3 - Element-focused:
"Update the color scheme to use vibrant colors: hot pink (#FF006E) for primary actions, electric blue (#3A86FF) for backgrounds. Make all cards 20% smaller and use softer shadows."
Option 4 - Mood-based with specifics:
"Make this feel more energetic and playful - use a bright yellow (#FFD23F) accent color, add subtle animations when hovering over cards, reduce card padding to make everything more compact, and use a more playful rounded font."
You can also specify the app to have an edit panel when there’s text content that makes sense to customize in future without coding.
To get an edit panel , you could ask: "Make the [title and button labels ] editable through Canva's edit panel".
Pro tips for styling prompts:
Mention specific hex colors if you have preferences
Reference apps or design styles you like (e.g., "like Duolingo" or "like Apple's design")
Be specific about spacing (e.g., "reduce by 25%" vs "make tighter")
Mention specific UI elements (cards, buttons, nav bar)
One change at a time works better than sweeping redesigns
Remember these are templates, You can specify anything you want
4. The App Functionality Prompt
At this point, your app is looking premium but some buttons may not be functional, and that’s okay. This is the prompt to fix that. It adds the human touch and tells Canva how users interact with the app. What they can click, input, track, or update, and what the app should display in response.
Here is a template:
“Add real functionality to this Canva mobile app so it behaves like a working tool, not a static design. Include editable input fields where relevant, such as text, numbers, or selections. Add checkboxes or toggles for tasks, habits, or steps. Automatically update summaries, totals, and progress indicators based on user input. Progress bars or counts should reflect completed versus remaining items. Charts, if used, should update when values change. Include a Save action and a Start New Day, Week, or Month action that resets trackers appropriately. Allow users to add a limited number of extra entries if needed. Open details in compact modals or slide-up panels, keep interactions smooth and minimal, avoid full-screen popups, and do not use emojis.”
5. The prompt to refine and troubleshoot nuances
At this stage, the app has a clear workflow, a premium look, and working interactions. Step 5 is where creators address the small issues that only show up once everything is in place.
Here is the prompt template to use
“Refine this app to improve usability and flow without changing the core structure. Make sections more compact where needed so the app feels easier to scan on mobile. Move secondary information into modals or slide-up panels. If a section contains long reference content, replace it with a button that links to an external document or resource. Keep the design and functionality intact, and only make targeted adjustments that improve clarity and ease of use.”
The exact workflow from idea to app
So now you know what you want to create and you have the prompts, Here’s a simple, realistic walkthrough to take a brand new idea and turn it into a working Canva app in under 20 minutes.
Step 1: Start Outside Canva
If you’re beginning with a PDF, worksheet, or document, don’t open Canva yet. First, use Prompt 1 in ChatGPT or Gemini to break your content into an app-ready structure. This step helps you strip away anything that doesn’t belong in an app and turns long pages into clear screens and sections.
At the end of this step, you should have:
A simple list of screens
A clear idea of what goes where
This is your blueprint.
Step 2: Introduce the App Concept to Canva AI
Now open Canva AI > code. Then use Prompt 2 (App Workflow & User Journey) to tell Canva AI what the app is, how the app should flow, what the home screen does, how users move between sections, and how information should be entered or revealed, as well as the number of screens. Most premium apps have 3-4 screens.
Step 3: Layer in the Premium Design
Once Canva has generated a basic version of the app, it’s time to refine how it looks. Now paste Prompt 3 (Premium Design & Visual Style) into Canva AI. This tells Canva how to reshape the app visually, tighter spacing, premium density, glassmorphism cards, gradients, clean icons, and a mobile-first layout.
This step usually transforms a basic-looking app into something that immediately feels more polished and intentional.
Step 4: Add Functionality and Live Updates
With the layout and design in place, you can now focus on how the app works. Use Prompt 4 (App Functionality & Live Updates) to tell Canva AI what should be interactive, what should update automatically, and how progress, totals, or charts should behave.
This is where your app stops feeling like a design and starts feeling like a tool someone could actually use.
Step 5: Refine your app
At this stage, the app already exists. It has a clear workflow, a premium look, and working interactions. This is where you make targeted refinements and finishing touches.
Typical adjustments at this stage include:
Making a section more compact so it fits better on mobile
Moving secondary content into a modal or slide-up panel
Linking a button to an external document, resource, or library
Simplifying a screen so the main action is clearer
Adjusting spacing, card size, or hierarchy for readability
Use the focused troubleshooting prompt 5 to tweak what already exists.
How to Use and Share Your App
Once your app is built and working, the final step is deciding how people will access it. The simplest option is to publish the app as a website directly from Canva. Canva lets you turn your app into a live, shareable web link in a few clicks. This works well for testing, demos, or internal use, and it’s fast.
However, if you want the app to feel premium and professional, the best move is to connect a custom domain.
Using a Canva-branded link makes the app feel like a prototype. Using your own domain makes it feel like a product.
How to Scale Like a Pro
This system was build to allow you scale and here is how you go about it.
01.Save What Works and Build a Prompt Library
If you tweak a prompt and Canva AI finally gives you exactly the look, layout, or behaviour you want save it. That prompt is now an asset. Over time, this turns into a personal prompt library you can reuse again and again.
02.Vary the Design Without Changing the System
You don’t need a brand-new app structure every time. Once a workflow works, you can scale by changing the surface layer:
Swap colour palettes
Adjust typography
Change the app’s tone (calm, bold, playful, professional)
Add a hero image
03.Repurpose the same structure for a different use case
One well-built app can become several products. A productivity dashboard can easily be adapted into s student planner, a freelancer task manager, a team check-in tool.
Instead of building new apps from scratch, you change the content and framing, not the foundation. This is how creators scale output without burning out.
Final Thoughts: Your App-Creating System
What you’ve seen in this post is a repeatable system for creating premium, engaging apps in Canva. It works whether you’re starting from a PDF, a spreadsheet, or just an idea in your head.
The power isn’t in any single prompt. It’s in the sequence:
Concept → user experience → design → functionality → refinement.
Once you understand that flow, there is no limit to what you can create. Whether you’re building apps for clients, creating digital products, or simply turning your ideas into something interactive, this system gives you a solid foundation to work from.


Comments